Getting started on Android
Installation
The Android API integration is fully supported in Eclipse ADT. Android Studio/Gradle integration is possible but will not be described in the following article. Integrate at your own risk.
Note : You can get an older version of the SDK in the Downloads section.
Project setup
Insiteo 's modules are provided as Android library projects with each one containing its own .jar under the libs folder. To use them, you will need to link your application project with every Insiteo Android library project you wish to use.
To do so under Eclipse, you have to select your project in the package explorer panel and right click -> Properties -> Android -> Add ... and select the corresponding project as follow:
-
Adding
CommonAPI_Libis mandatory -
Add
LocationAPI_Libif you want to use Insiteo's location API or any Location Based Services, -
Add
MapAPI_Libto use Insiteo's tiled maps API.
Requirements
Furthermore in order to grant all required access to our API you will need to add the following permissions, service in your android AndroidManifest.xml:
// Required by CommonAPI_Lib
<uses-permission android:name="android.permission.INTERNET"/>
<uses-permission android:name="android.permission.WRITE_EXTERNAL_STORAGE" />
<uses-permission android:name="android.permission.WAKE_LOCK"/>
<uses-permission android:name="android.permission.ACCESS_NETWORK_STATE" />

// Required by LocationAPI_Lib for GPS, WIFI and BLE scan
<uses-permission android:name="android.permission.ACCESS_FINE_LOCATION"/>
<uses-permission android:name="android.permission.ACCESS_WIFI_STATE"/>
<uses-permission android:name="android.permission.CHANGE_WIFI_STATE"/>
<uses-permission android:name="android.permission.BLUETOOTH" />
<uses-permission android:name="android.permission.BLUETOOTH_ADMIN" />

// CAUTION: make sure to declare the location service.
<service android:name="com.insiteo.location.LocationService" />
Initialization
Start the API
Before using any of Insiteo's services, you have to initialize the InitProvider singleton: we will give you information to interact with our servers. A SITE_ID, a LANGUAGE and an APPLICATION_VERSION will be
generated in order to identify your application, a SERVER_URL will be created to communicate with our server. Using this information, you will be able to initialize the API.
Note : The InitProvider also requires a
Server parameter. This can take the following values
Server.DEV,
Server.TEST and
Server.PROD and is used to store the packages at the appropriate location on the SD card. Please make sure to use the proper value
according to the URL server that was provided.
Note : Before starting the API you have to set the API key that you can found in your INSITEO account. To do so
use: InitProvider.getInstance().setAPIKey(API_KEY);.
This must be done before calling startAPI(...).
You can now safely start Insiteo API by calling startAPI(...) ,
with an IInitListener passed as parameter.
The onInitDone method will be called on your listener when initialization is finished.
int SITE_ID = 356;
int VERSION = 1;
String LANG = "fr";

String SERVER_URL = "https://services.test.insiteo.com/v3/Insiteo.Dispatch.test/Insiteo.Dispatch.svc";
Server SERVER = Server.TEST;

boolean ANALYTICS_ENABLED = true;

private void initAPI() {
	final InitProvider initProvider = InitProvider.getInstance();

	// Set the Insiteo API key in order to use the SDK
	initProvider.setAPIKey(MY-API-KEY);

	// Launch the initialization process, the returned ICancelable can be used to cancel
	// the initialization task.
	ICancelable mInitTask = initProvider.startAPI(context, listener, SERVER_URL, SITE_ID, VERSION,
	LANGUAGE, Server.TEST, ANALYTICS_ENABLED);

	(...)
}


/**
 * Callback received on API server initialization
 */
@Override
public void onInitDone(final EInitResult aInitRes, final InsiteoError aError) {
	runOnUiThread(new Runnable() {
		@Override
		public void run() {

			mInitProgress.dismiss();

			switch (aInitRes) {

			case FAIL:
				/**
				 * Initialization failed, you can check the InsiteoError for further
				 * information. In this case the API can still be used if the packages
				 * were already downloaded  but some services such as Meetme will not
				 * be functional.
				 */
				break;

			case SUCCESS:
				/**
				 * Initialization succeeded and no new data are required to be download.
				 * The Application can use all the LBS services as they are.
				 */
				break;

			case SUCCESS_WITH_NEW_DATA:
				/**
				 * Initialization succeeded and new data are available. If the
				 * application is launched for the first time the data will be
				 * required for the application to work (for example to download
				 * the map tiles) so the download process must be triggered.
				 * Otherwise those data are optional.
				 */
				break;
			}
		}
	});
}
Note : startAPI(...) method is asynchronous.
Be sure to provide a valid IInitListener, to be notified of init ending.
If startAPI(...) returns:
-
SUCCESS, you can use INSITEO APIs straight away. -
SUCCESS_NEW_DATA, it means that new data packages are available on INSITEO servers. You can then call theupdatePackagesmethod on theInitProvidersingleton in order to download and install new data (update is asynchronous, thus its result will be send to the listener, through theonDataUpdateDonecallback). -
FAIL, it means that INSITEO servers could not be reached. If you want to use an INSITEO module, you have to check if your application has enough data to run. This can be done usinghasPackageonInitProvidersingleton.
Handle data updates
InitProvider as below:
// Trigger the package update. Like the initialization the
// ICancelable task can be used to be cancel the update.
ICancelable mUpdateTask = InitProvider.getInstance().updatePackages(activity, listener, false);

// The following callbacks will be notified.

/**
 * Callback received when the download of new data is processing.
 * Those data can be used to notified the user.
 */
@Override
public void onDownloadProgress(long aDownloadedBytes, long aTotalBytes) {
}

/**
 * Callback received when a new package is starting being downloaded
 */
@Override
public void onPackageDowloadBegin(EPackageType aPkgType) {
}

/**
 * Callback received when the installation of new data is processing.
 * Those data can be used to notified the user.
 */
@Override
public void onInstallProgress(long aCurrentFile, long aTotalFiles) {
}

/**
 * Callback received when the entire process of data update is done
 */
@Override
public void onDataUpdateDone(final boolean aSuccess, final InsiteoError aError) {
}
Note: updatePackages method is asynchronous.
Be sure to provide a valid IInitListener, to be notified of initialization events.
When updating packages, the IInitListener will receive notifications for packages download progress, and then for packages install progress. Once the update is finished, the
IInitListener will receive an onDataUpdateDone event.
When calling updatePackages, an
ICancelable is returned. Call cancel on this object to cancel the current update.
Map
Note: Be aware that you need to have installed at least the following packages:
-
A
MAPDATApackage, which contains maps information such as zoom levels and scales. -
And a
TILESpackage, which contains.3cmfiles that will be displayed.
InitProvider.getInstance().hasPackage(EPackageType.MAP_DATA);.
Adding graphical objects on map
An MapView is provided and can be used to display a specific 2D map with specific interactive areas. The API also provides advanced features such as additional rendering layouts management (promotional,
special areas etc …) or specific events handling.
By default, the MapView will display a tiled map of the site, and provide basic functions on this map (such as move, center, and pinch to zoom). But it also allows you to display custom interactive objects on
this map. This will be done using custom renderers and custom render touch objects using the IRTO listener.
The MapView will handle the drawing of the map and all objects. It will loop over all the renderers and call their draw method.
Each renderer owns a list of IRTO. In its draw method, the renderer will loop on this list, and call draw on each IRTO.
The MapViewController will also detect touches, and dispatch them to all IRTO.
A listener can be set on the map controller, to be notified of clicks on specific IRTO class (see MapView class documentation).
The MapViewController will also detect touches, and dispatch them to all IRTO. A listener can be set on the map controller, to be notified of clicks on specific IRTO class (see MapViewController class documentation).
Your Activity using the MapViewController will also have to implements the IMapListener
MapAPI, you will need to get an MapView instance and its associated controller:
//MapView initialization in JAVA
MapView mMapView = new MapView(getActivity());

// or in xml
<com.insiteo.map.MapView
    android:id="@+id/insiteo_map"
    android:layout_width="fill_parent"
    android:layout_height="fill_parent" />
Note:
-
You will need to initialize
InitProviderbefore instantiatingMapView. -
MapViewControllerevents will be notified via theIMapListenerinterface. The singleIMapListenerassociated to the map is by default theContextthat created it (theActivityin most cases) but can be change with theMapViewController#setListener(IMapListener aListener)method (useful when your using theMapViewin aFragment).
Create your own IRenderer
A renderer is a class that defines drawing behavior for a certain type of IRTO. If you want to use your own customized renderer, you will need to create a
class that implements the IRenderer interface. Then you will be able to specify the renderer behavior through the draw method for example. You will also have
to set a priority to your renderer that will define the order in which they will be drawn (highest priority will appear on top of the map).
To register a new renderer as a map's renderer, simply do like this:
//How to add a custom renderer
mMapView.getController().addRenderer(mCustomRenderer);
Note: All IRTO of class corresponding to the custom renderer class, when added via MapViewController, will be put in custom renderer. See "Use your own IRTO"
chapter below.
You will also need to implement an exhaustive list of functions described in the listener. See the complete documentation for more details.
Create your own IRTO
IRTO listener. Then you will be able to specify your object's behavior through methods like:
//The method you will need to override in order to manually manage your object rendering
public void draw(Canvas aCanvas, double aRatio, Point aOffset, float aAngle){
}
//The method you will need to override in order to manually manage touch down events
public ETouchObjectResult onTouchDown(Touch aTouch){
}
MapViewController, using the following methods:
//Methods you will need to call in order to add an RTO on the map
public boolean addRTO(IRTO aObject);
public boolean addRTOInZone(int aZoneID, IRTO aObject);
IMapListener following callback:
//The method you will need to override handle touch events on interactive zones
public void onZoneClicked(int aZoneID, EZoneAction aActionType, String aActionParam);
You can then add your IRTO that will be displayed in this area.
Link with external content
With the Insiteo API, you can link your content to our zone based system. To do that you will have to register this content through our back office. For example you can link a shop to one of our zone and then, get back this content in your application, simply by requesting our API.
Insiteo Interactive maps - 2 minutes tutorialMapDBHelper class like so:
// Get all Zone/POI assocations for a given external identifier
List<ZonePoiAssoc> zonePois = MapDBHelper.getZoneAssocFromExtPoi(extPoiID);
Note: An list is returned, because you can link a POI to several zones and a zone can contains several POIs.
MapDBHelper class like so:
//Get all external Zone/POI assocations for a given zone identifier
List<ZonePoiAssoc> zonePois = MapDBHelper.getPoiAssocFromZone(zoneId, isExternal);
Each method returns an ZonePoiAssoc object which contains a position in meters and an offset (if specified) in order to place your on
IRTO on our map.
Note:
- You can decide to use this offset or not.
-
If you decide to use this offset, it's up to you to use it in your
drawmethod.
IRTO to our map like so:
// Add an RTO in the zone center
mMapView.addRTOInZone(zoneId, myRTO);
Location
Note: If you intend to use the this service you have to make sure that the location package have been properly downloaded.
You can easily check if the package is available on the device with the following method:
InitProvider.getInstance().hasPackage(EPackageType.LOCATION);.
Location process

Get your first location
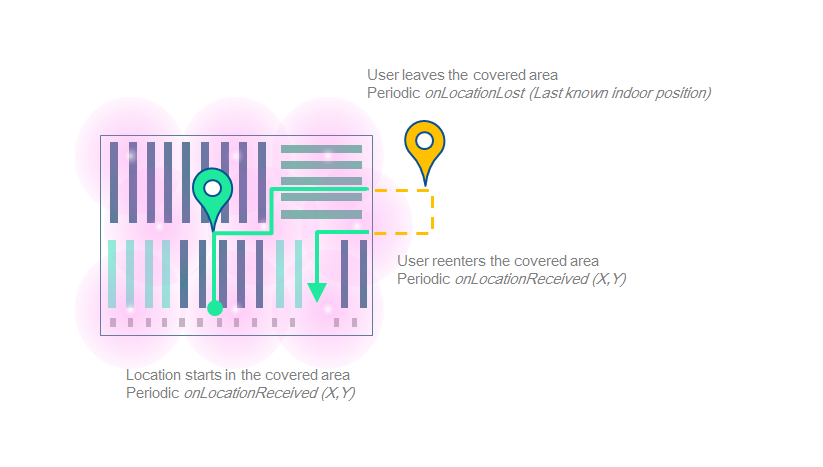
You can use our LocationAPI to obtain location information. The LocationAPI needs initialization information in order to communicate with our servers. You can easily link this library to the INSITEO map, so the location can be displayed on it.
LocationAPI, you will need to create an LocationProvider instance . To receive location, you will need to start the
LocationProvider,
with a context and an ILocationListener. This listener will receive location events. You also have to set flags indicating location behavior, and a default map identifier:
// Retrieve the LocationProvider singleton
LocationProvider locProvider = LocationProvider.getInstance();

// And start the location process with the required flags.
locProvider.start(getActivity(), this, InsiteoConf.LOCATION_FLAGS);

// Add location renderer to the MapView so that location is automatically displayed.
mMapView.addRenderer((LocationRenderer)LocationProvider.getInstance().getRenderer(getResources()););
Important: Please contact us to get the appropriate location settings.
Note:
- The API needs to be initialized.
- You can now be notified when no registered beacons were detected, which probably means that the user started the location whereas he is not on site.
Available services
Available location-based services are:
-
ELocationModule.ITINERARY: this module computes the route between an arrival point, and a departure point (could be the user current location). -
ELocationModule.GEOFENCING: this module detects when user location is in "active" areas, and notify the application that the user entered/stayed in/left these areas.
Note: To use them, you have to request them from LocationProvider with the
getModule method.
Be aware that a new module is created for each call of getModule.
Itinerary
Note: If you intend to use the this service you have to make sure that the itinerary package have been properly downloaded.
You can easily check if the package is available on the device with the following method: InitProvider.getInstance().hasPackage(EPackageType.ITINERARY);.
Enable itinerary rendering
Itinerary or Geofencing you have to get the module from the location provider. If you want it to be displayed on an INSITEO map, do as follow:
// Retrieve the itinerary module from the LocationProvider
mItineraryProvider = (ItineraryProvider) LocationProvider.getInstance().getModule(ELocationModule.ITINERARY);

// get itinerary renderer linked to provider
mItineraryRenderer = (ItineraryRenderer) mItineraryProvider.getRenderer(getResources());
mItineraryRenderer.setPriority(10);

// Add this renderer to the map renderers list
mMapView.addRenderer(mItineraryRenderer);

// Register for itinerary rendering user interaction (such as clicks).
mItineraryRenderer.setListener(this);
Request an itinerary between two points
// Request an itinerary between two points.
Position departure = new Position(startMapId, 40, 40);
Position arrival = new Position(destMapId, 168, 100);
mItineraryProvider.requestItinerary(departure, arrival, this, PMR_ENABLED);
Note: An ItineraryRequest is returned in order to identify sender through callbacks.
Request an itinerary from user location
// Request an itinerary from the user location to a point arrival.
// With USE_LAST_LOC, you can decide to use the last location or wait for a new one.
// With PMR_ENABLED, you can set the itinerary to use only path for disabled persons.
Position arrival = new Position(mapID, 168, 100);
mItineraryProvider.requestItineraryFromCurrentLocation(arrival, USE_LAST_LOC, this, PMR_ENABLED);
Request an optimized route
// Request an optimized route between several positions (an OptimizeRequest is returned)
mItineraryProvider.requestOptimizedItinerary(pos, EOptimizationMode.EOptimizationModeNearestNeighbourShortestPath, true, false, this, false);
Note: You can specify if you want to keep the first position, last position, or both.
Note: There are multiple optimization modes available but we highly recommend to keep
EOptimizationMode.EOptimizationModeNearestNeighbourShortestPath as the default one.
Recomputation
/**
 * Callback fired when the itinerary of the last request changed (when location is updated for example).
 * This method can be used to ask for a new itinerary if the user is now too far from the itinerary (we usually recompute
 * the itinerary over a distance of 5 meters).
 * @param aRequest the related request
 * @param aDistanceToIti the distance between the user location and the itinerary (in meter)
 */
@Override
public void onItineraryChanged(BaseRequest aRequest, float aDistanceToIti) {
	if (aRequest instanceof ItineraryRequest && LocationProvider.getInstance().isStarted()) {
		if (aDistanceToIti > MAX_RECOMPUTATION_DISTANCE || aDistanceToIti == -1) {
			computeItinerary();
		}
	}
}
Note: We usually use 5.0 meters as MAX_RECOMPUTATION_DISTANCE.
Geofencing
Note: If you intend to use the this service you have to make sure that the geofencing package have been properly downloaded.
You can easily check if the package is available on the device with the following method: InitProvider.getInstance().hasPackage(EPackageType.GEOFENCING);.
Start the Geofencing module
Geofencing module, you just have to retrieve the instance from the LocationProvider and register as a IGeofenceListener.
// Retrieve the geofencing module
mGeofenceProvider = (GeofenceProvider) LocationProvider.getInstance().getModule(ELocationModule.GEOFENCING);

// Register as a IGeofenceListener
mGeofenceProvider.setListener(this);
Understand geonotifications
ISGeoFenceZone.
- The first one contains all zones the user just entered
- The second one contains all zones where the user still is and has spent a certain time .
- The third one contains all zones the user just left.
/**
 * Called when geofencing module has new data available.
 * @param aEnteredZones list of zones that location has just entered
 * @param aStayedZones list of zones where location has stayed for a certain amount of time
 * @param aLeftZones list of zones that location has just left
 */
@Override
public void onGeofenceUpdate(List aEnteredZones, List aStayedZones, List aLeftZones) {
	Log.d("Geofencing", "onGeofenceUpdate " + aEnteredZones.size() + " "
	+ aStayedZones.size() + " " + aLeftZones.size());
}